Field Papers
Download Landsat 5,7 images using python script
Installing QGIS 3 on Ubuntu 16.04
QGIS 3.0 is out and from the blogs and tweets, it looks awesome. Some one asked me how to install QGIS 3.0 on Ubuntu 16.04, so here are the steps.
First, if you have previous version of qGIS, lets delete that
sudo apt-get autoremove qgis

sudo apt-get --purge remove qgis python-qgis qgis-plugin-grass

sudo apt-get autoremove
Now edit /etc/apt/sources.list by using the following command
sudo vi /etc/apt/sources.list
Note: Sudo is required because normal users do not have rights in /etc/apt/ folder.
Now this is where is trick is, instead of adding debian or ubunutgis repositories add ubunutgis-nightly-release, so add the following two lines in source. list
deb https://qgis.org/ubuntugis-nightly-release xenial main
deb-src https://qgis.org/ubuntugis-nightly-release xenial main
Rest is simple, first update
sudo apt-get updateand then install
sudo apt-get install qgis python-qgis qgis-plugin-grass sagaThats it.
Some of the dependencies will not be there if we use ubuntugis-nightly-release repository reference.
Text Editors
In the last few years, I have tired many text editors like gedit, sublime, vi, vim and now Atom. You can read more about Atom on their website.
What I like about Atom is the packages, gedit and sublime also has packages (reference) for example I like cli panel in text editors, like Embedded Terminal in gedit

However, I needed a text editor that can support a cli and a webbrowser plugin (see the image below). Atom does that as it has a terminal-plus (don’t install it before you read the complete blog) and browser-plus.

Installation
Use the following commands on Ubunut to install Atom
sudo add-apt-repository ppa:webupd8team/atom
then
sudo apt update

sudo apt install atom
Packages
Some of the packages I like are (you can install them using atom builtin package manager or command line utility apm)
autocomplete-python 1.10.2
autocomplete-python-jedi
atom-bootstrap4 ver 1.4.0
some other good autocomplete packages are
autocomplete-json

atom-django 0.3.2
django-templates
and some other packages
browser-plus 0.0.98
(open browser by using ctrl-alt-o)

emmet 2.4.3

linter-flake8 2.2.1

terminal-plus 0.14.5 (I had problems installing this one)

platformio-ide-terminal
Some Issue
Some installed packages could not be loaded because they contain native modules that were compiled for an earlier version of Atom like with terminal-plus package
Solution to terminal-plus package issue
https://github.com/jeremyramin/terminal-plus/issues/402
The solution worked on my unbunut 14 laptop, but I could not make it work on ubunut 16. I did some searching and then opted for “platformio-ide-terminal” as some one said it is not in development any more (the repo is at least one old https://github.com/jeremyramin/terminal-plus). The package “platformio-ide-terminal” works out of the box.
Note: For color change (in package setting), restart Atom after colors are changed.
if you want to remove atom, use the following command.
sudo apt remove --purge atom
What do you think, you want to give it a try.
Updates:
If you get an error like
Err:1 http://ppa.launchpad.net/webupd8team/atom/ubuntu xenial/main amd64 atom amd64 1.24.1-1~webupd8~0
 Hash Sum mismatch
Do the following (reference)
sudo rm -rf /var/lib/apt/lists/*
sudo apt clean
sudo apt update
Excel functions
Microsoft Excel OR LibreOffice Calc are excellent tools for data cleaning. For small to moderate level tasks, I always use LibreOffice Calc but very time I use Calc functions, I have to search for functions as I cannot remember functions names or parameters. Thus this blog
Some interesting functions
1. Relplace/Remove unwanted characters
Ctrl+H is for find and replace, I use it all the time to remove special characters (end of line chearacter), spaces etc
2. Multiple data fields in one column.
Multiple fields in one column and I want them to be separated in multiple column
Example:
I have test “Alex 30years” in column A1 and as you can see these should be in two columns Name and age .I want any thing after first space to be in B1.
Now, will go to column B1 and paste the following
=MID( A1,FIND(" ",A1)+1,100)
Explanation:
- FIND(“character”,cell_number) will find and return the location of given cheracter.
MID(cell_number) will extract substring from cell A1 and the substring will start from the location returned by FIND() function till 100th character (yes we can use lenth function instead of static number like 100)
3. sting concatenation
Have you seen a case where you have two or more columns and you want to generate a new column based on available columns. The colution is CONCATINATE() function. Here how it works
Example:
There are four columns with data

Now you want to column E to appear like “abc to z”. Click on cell/column D1 and use the following command
=CONCATENATE(A1,B1,C1," to ", D1)
I think its self explanatory :). This Example is not very interting so lets look at an interesting exmaple.
Suppose you have four pairs of latitudes/longitudes (a bounding box, see the image below) in columns and you want to make a csv which can be imported into qGIS in such a way that the columns becomes geometry.

We can generate a geometry column containing Well Known Text (WKT) by concatinating pairs of lat/long. Any GIS software that supports WKT will generate shapes based on this column.

and the code to generate wkt column is
=CONCATENATE("POLYGON ((",A2," ", B2,",",A2," ",C2,",",C2," ",D2,",",D2," ",B2,",",B2," ", A2,"))")
Save this exel sheet as csv and import in qGIS (by using layer – csv option). If every thing goes well, you will see a bolygon layer (like the one below)

Now if you have many rows, you can replicate the formula (by dragging it) on other columns.
Two interesting plugins for QGIS
QGIS has made its mark in FOSS4G and third party plugins make it more and more attractive. I will introduce two more plugins today which could also be useful for you.
MultiQml
If you have many layers that require a similar style, you have to assign style for each layer one by one. Not any more, MultiQml can perform this tedious task for you.
First load all required layers. Second, style any one layer and save the styling information as ‘QGIS Layer Style File’ below. You can use ‘Layer properties’ form to save styles (see below).
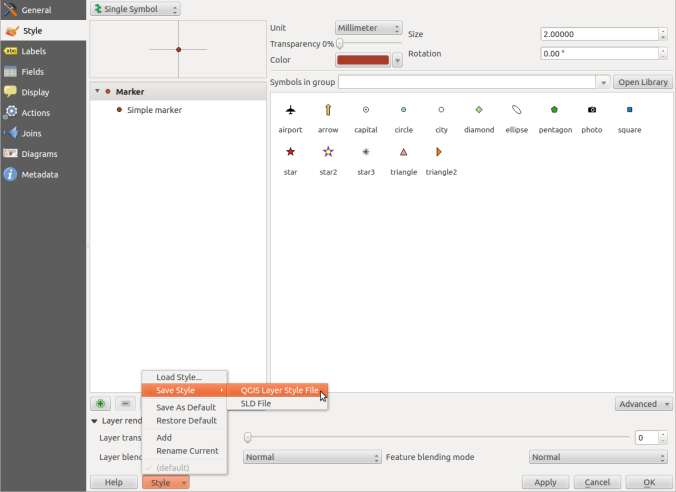
Start MultiQml from menu, perform the following
- Raster / Vector layer type
- Select all layers
- Apply style
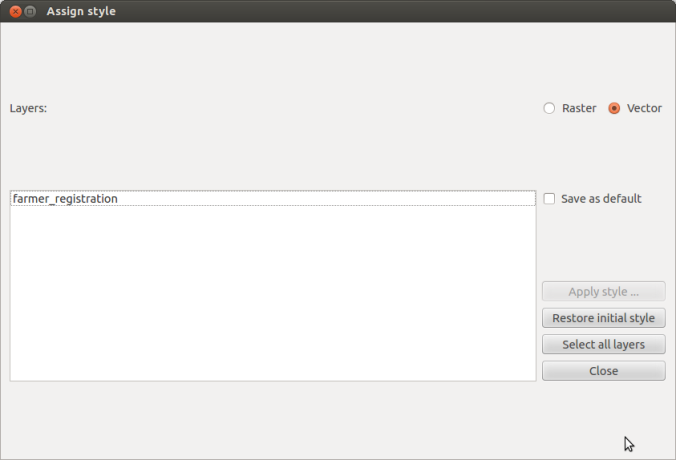
The final operation will apply the same style (theme) to all the layers (in one go, saves a lot of time :)).
Table manager
In QGIS, if you want to change the attribute of shape file it is not possible directly. For example, you want to change the upper case character in field ‘Name’ to ‘name’, you cannot do that.
Now some one might think, why would I want to change the attributes from upper to lower characters. Well …. actually you don’t need to until you wan to upload this shape file to PostgreSQL/Postgis. If you have upper case character as attribute names (or as field names in database terms), you cannot access them (in a query) like normal attributes. For example a select on country shape file with upper character (below) will return an error
select * from country where Name = ‘Sweden’;
one way to to correct the above query is to use quotes in field name
select * from country where “Name” = ‘Sweden’;
OR use ‘Table manager’ plugin to edit the attribute names. Start ‘Time Manager’ and it will pick the active layer and will show you all the attributes (below)
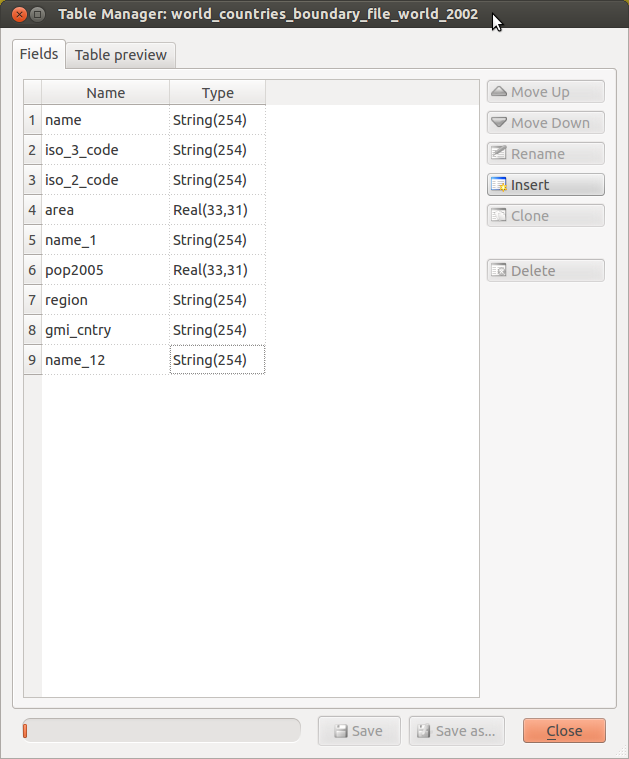
You can rename a attribute, change attribute order, clone an attribute, insert an attribute and delete an attribute.
puts, print and p in ruby
I’ve been trying to pick up Ruby and one of the things I was asking myself was the difference in the various ways you can output text.
- puts: displays text and adds a newline character
- print: displays text and doesn’t add a newline character (this means you must add newlines manually when using print)
- p: while it’s similar to puts in that it adds a newline, it calls
inspectinstead ofto_sThis is why p can be more useful for debugging since it shows what class an object belongs to.

More references for those interested
- https://matt.berther.io/2009/02/11/puts-vs-print-in-ruby/
- http://www.ruby-doc.org/core-1.8.7/Kernel.html#method-i-p
Developing on OS X – Part 1
This multipart series will take you through how to setup a Python development environment on OS X Yosemite & El Capitan. We will setup Python…and the various helpers I use for Django development. We’ll also install a few other applications I make use of in my day-to-day coding activities. For this first part, we’ll go through settings up the various helper applications we’ll end up using for our Python setup
Enabling Writing to NTFS
Install Homebrew and Homebrew Cask
For anyone new to OS X, homebrew is a package manager, and it enables you to install command-line applications and libraries that would require manual compilation. While Homebrew Cask extends Homebrew.
To install homebrew, run this command on your terminal:
ruby -e "$(curl -fsSL https://raw.githubusercontent.com/Homebrew/install/master/install)"To get Homebrew Cask run this command on your terminal:
brew tap caskroom/caskWe’re now ready to install osxfuse…El Capitan users will want to install the 3.x.x version (3.1.0 or higher would be best) to avoid System integrity Protection issues https://github.com/osxfuse/osxfuse/releases. For Yosemite, brew will suffice
brew cask install osxfuseThe final step to give you write-access to NTFS will be to install ntfs3g.
brew install homebrew/fuse/ntfs-3gIf using El Capitan, System Integrity Protection’s fs role will first need to be disabled. This is needed to enable writing to /sbin
- reboot and hold CMD+R to go into recovery mode
- Run this on a terminal:
$ csrutil disable - reboot normally
Create a symlink to mount NTFS
sudo mv /sbin/mount_ntfs /sbin/mount_ntfs.original
sudo ln -s /usr/local/sbin/mount_ntfs /sbin/mount_ntfs
Remember to re-enable System Integrity Protection (and re-lock the system directories) if you’d previously disabled it (same steps as before), only run $ csrutil enable
After that you should now be able to read and write to your NTFS drives.
Xcode
Xcode is an integrated development environment (IDE) containing a suite of software development tools developed by Apple for developing software for OS X and iOS. While you don’t need the entire suite, you’ll want to install the command line tools. Run this command then follow the instructions:
xcode-select --installTerminal
I always like having a good terminal at my disposal…iterm2 is my custom terminal of choice on OS X. To get iTerm2, download and install it as a normal OS X pkg file
Version Control
It’s always recommended to have a VCS in place when you’re writing your code….this way you can always revert to a previously working version of your code if you break something along the line. It’s a matter of personal preference which VCS you use, but I like git. And for anyone new to VCS, this handy guide explains it all.
To install git:
brew install git
Next step is to configure git for your setup. If you haven’t configured your SSH keys, that would be the first thing. If you get stuck, this Github link will help
ssh-keygen -t rsa -C "<your-email-address>"
git config --global user.name "<your-name>"
git config --global user.email "<your-email-address>"
After this add your key to your Github account (same process for Bitbucket or any other code hosting site where you can upload your SSH keys).
PRO TIPS:
- You can never be too careful with your code so it’s always a good idea to enable two-factor authentication whenever possible.
- For Android users, if you change phones frequently, instead of the Google Authenticator app, you can check out Authy…it’s slightly better since it has a clud backup feature, and if you’re a Chrome user, you can even register your browser as an MFA device
That’s it for the basics…in the next blog post we’ll get down and dirty with getting Python running
Creating web maps using leaflets
Source: Creating web maps using leaflets
